
Syncthing Graduation Day
Today marks a milestone of sorts. It’s the first day of the new year and, as it also happens to be the first Tuesday of the month, it’s a Syncthing release day. Today is also almost Syncthing’s birthday; the first public release was “0.2” on December 30, 2013, five years and two days ago.
This was originally a forum post. It’s reposted here for posterity.
Today marks a milestone of sorts. It’s the first day of the new year and, as it also happens to be the first Tuesday of the month, it’s a Syncthing release day. Today is also almost Syncthing’s birthday; the first public release was “0.2” on December 30, 2013, five years and two days ago.¹
Given all of this I thought this would be a good day to let Syncthing graduate and become a 1.0 kind of thing.
Much like a black belt in martial art doesn’t indicate that you’ve learned all there is to know, a 1.0 version doesn’t mean Syncthing is done. There is a lot left to do and learn. At the same time we need to be aware that Syncthing is used “in production”. Syncthing gets roughly a million downloads of each stable release, just from Github, and syncs probably hundreds of terabytes of changes each day. Our users are entrusting precious data to Syncthing. We need to treat that trust with respect.
As much as a version number means anything at all, a “major zero” version number means that you can expect breakage. This is not what we want to communicate. Especially, it’s not the mindset that we should have towards our users. Hence Syncthing is now graduating from being in perpetual beta to being actual release software, yet the journey of development continues.
Seeing as this is a new major release Syncthing will also be granted a new code name. The Dysprosium Dragonfly took flight with 0.14.0 in July 2016. Now it morphs into the alphabetically adjacent Erbium Earthworm.
Anyway. Enjoy your regularly scheduled Syncthing release, thank you all for these five years, and we look forward to five more years of continued relevance and increasing stability. :)
For those who might wonder how this release relates to the 0.14.55-rc.2 release candidate, the answer is that it’s identical apart from the code name and version number.
Of course there existed some code for a few weeks prior to that. We allow people a gestation period though so I’m going to cut Syncthing some slack there as well.
Syncthing — Receive Only Folders
In Syncthing v0.14.50 we’re adding the initial implementation of “receive only” folder types. This makes the set of folder types the complete trio - send only, receive only, and the default send-plus-receive. This has been an oft requested feature for quite some time but nailing down the exact mechanics of how it was supposed to work has been a bit tricky.
In Syncthing v0.14.50 we’re adding the initial implementation of “receive only” folder types. This makes the set of folder types the complete trio - send only, receive only, and the default send-plus-receive. This has been an oft requested feature for quite some time but nailing down the exact mechanics of how it was supposed to work has been a bit tricky.
There are many different expectations on how this type of folder should work and some of them have been incompatible with Syncthing core values. First and foremost we do not want to automatically undo changes a user makes to their files.
The current implementation is sort of the “minimum viable” one - as little as possible to be able to check the feature checkbox. This is intentional because we’re not really sure how it will be used in practice, and it allows us room for further enhancement in the future.
In short, a receive only folder will not prevent the user on that device from making changes to files and it won’t automatically, immediately, undo any such changes. It will however avoid sending the changes to the rest of the Syncthing cluster, and it gives the user an option to undo local changes manually.
We think receive only folders will work well for people using Syncthing as a component in their content distribution or backup solution. It prevents mistakes at the individual client level from propagating onwards while still allowing the individual user control over their files.
Footnote, sort of: if you really want to immediately undo any local changes, stick this script in your crontab to run every few minutes. Replace the host, API key and folder ID as appropriate. It checks the API for changes to the folder and does a revert when there are changes.
#!/bin/sh
host=https://localhost:8384
apikey=yourAPIkeyHere
folder=someFolderID

if ! curl -skH "X-API-Key: $apikey" "$host/rest/db/status?folder=$folder" \
  | grep -q 'receiveOnlyChanged.*": [1-9]' ; then
  exit 0
fi

curl -X POST -skH "X-API-Key: $apikey" "$host/rest/db/revert?folder=$folder"
Syncthing — How Syncing Works
Previously we explored how Syncthing detects local changes and indexes information about files. Now we’re going to look closer at how Syncthing handles changes from other devices.
Previously we explored how Syncthing detects local changes and indexes information about files. Now we’re going to look closer at how Syncthing handles changes from other devices.
Recall that files are divided in blocks - typically 128 KiB each, but possibly larger for larger files. Each device calculates the hash (cryptographic checksum) of all blocks making up a file and informs its peers about the file contents. Let’s imagine a file consisting of eight blocks, they grey ones here.

Our blocks.
When Syncthing gets an index update from a peer device, containing a new block list, it compares the new block list with the one it already has in the index. If there are differences that means the file contents have changed and we should synchronize the file. Lets say we get a list of eight blocks from another device - the blue ones in this illustration.

Their blocks.
We compare the blue blocks we got from the other device to our grey ones. In some cases they are the same – the block data hasn’t changed. Those go onto a have list. In some cases they differ – the block data has changed. These go onto a need list.

Have and need lists.
Now that we know what we have and what we need it’s time to start syncing. Syncthing never alters an existing file, in order to avoid inconsistent files visible to the user. Instead, we create a new temporary file of the right size with no contents.

An empty temp file.
Now that we have a temporary file we copy all the unchanged blocks from the existing, old version of the file. After reading each block we calculate the hash and make sure it is what we expect.

Blocks being copied.
At this point we’ve done what we can with just the data from the existing copy of the file. We still need to handle the blocks in the need list - B2, B3, and B5. For each of these Syncthing will attempt a database lookup of the hash. The index database not only maps files to block lists, but also maps block hashes to files and offsets. This means that if a certain block exists locally in another file, we will find it any copy it. As always, the hash is verified while copying.

Blocks reused from other files.
Any remaining blocks at this point can’t be found locally so we must ask other devices for them. Syncthing sends requests for the blocks, verifies the responses against the expected hash, and writes the block to the temp file.

Pulling blocks.
Once all blocks have been put in place the temp file gets the correct permissions, attributes and modification time set. Then the old file is removed or archived, and the temp file is moved into place.

The end result.
The sync is complete and we can update the index database, and send index updates to our peers.
Simplifications
I glossed over a couple of things.
In addition to the straight up block hashes there is also a rolling hash that is computed over the file. We use this to find blocks that have moved in a file – for example if a file was rewritten with more data at the beginning, causing a bunch of blocks to move to a new offset. This comes into play in the copying step, allowing us to find blocks that have the right content but are not at an exact block offset any more.
When an index update includes both a new file and a delete of another file with the same block list we handle it as a rename.
A sync might fail for whatever reason, perhaps that a required block can’t be found in the cluster. In this case Syncthing will keep the half done temp file around, and process it for blocks to reuse on the next sync attempt.
There’s a lot of juggling of permissions, to be able to create files in read only directories for example. There’s also various safety checks along the way to detect if the user suddenly changed the file themselves while were syncing it, to avoid stomping on their changes.
Syncthing can also send index updates while creating the temp file, and other devices can request blocks from our temp file while we are still working on it.
Syncthing — How Scanning Works
What is Syncthing doing when it says “Scanning”, and what’s the point of it?
To answer that we first need to talk about the index database.
What is Syncthing doing when it says “Scanning”, and what’s the point of it?
To answer that we first need to talk about the index database.
The Index Database
Syncthing keeps a index database with information about each file, directory, and symlink it knows about. Each entry contains the name of the item, some metadata like size, timestamps, and permissions; internal information like a version vector and sequence number, and a list of the blocks making up the file. The index is keyed on folder ID, device ID, and file name. We can imagine it something like this:

Sketch of the database structure.
The blocks are all of a specific size, historically always 128 KiB each. Nowadays we use larger blocks sometimes, and of course the last block is usually smaller unless the file size happens to be an even multiple of the block size. (Directories and symlinks don’t have any blocks; apart from that the handling is the same.)
Keeping this database up to date is called scanning.
The index entries are stored in the same format that is used to exchange index information between devices. It is described in our protocol buffer schema.
Scanning
Scanning is a three step process.
Walk the folder on disk, comparing each found item with the corresponding item in the index database. Queue any differing items for further inspection.
Hash the files we queued in step one.
Walk the index database for the folder, checking if each item in the database still exists on disk. Queue any missing items for deletion.
In steps one and two we find and hash new or updated files, in step three we find files that have been deleted. These steps can all take up a long time or be really quick, depending.
Step One - Walk the Folder
Walking the folder on disk and comparing to the database is quick if both the file metadata and the database are mostly cached in RAM. If not, and the folder is large, it can take a while and cause a lot of I/O. We can’t predict how long this step will take because we don’t know what the contents on disk are before we look - hence this step is shown simply as “Scanning” in the GUI, without any progress indication.
Step Two - Hash the Files
Once we’ve built a list of files to hash we know how much work is left to do in step two. The hashing process reads each changed file, computes the cryptographic hashes for each block, and periodically updates the index entries in the database. I say “periodically” because it’s done in batches instead of immediately for each file, for improved efficiency. The new index information is also sent to other devices when it is committed to the database. This has effects on rename detection.
During this step the GUI shows progress information - “Scanning (52%)” and similar. We also calculate the current hash rate and estimate how long the scan will take to complete.
Step Three - Scan for Deletes
Once the hashing is complete the third step kicks in to look for deleted files. This is yet another folder walk and the performance considerations are the same in step one. The GUI shows “Scanning (100%)” while this is ongoing, which might be less than totally intuitive. Usually, however, this step is quick enough for it not to matter.
Filesystem Notifications
The process above describes what Syncthing has done pretty much since its inception. Nowadays Syncthing supports listening for filesystem notifications, which gives us faster response to changes and less need to scan. Internally it works much the same as the three step process described above - it’s just that the process is limited to the files or the subtree that has changed. That is, instead of scanning the whole folder on a set schedule we scan individual files and directories when notified about them having changed.
Events are aggregated and processed in batches. Aggregation means that in some cases, instead of scanning many changed files individually we will do a full scan of their parent folder. Batching means that there is a certain delay, mostly to wait for further changes affecting the same file or files in the vicinity, before processing the whole set of changes in one go.
Moving On
Now you know how scanning works. The next article in the series is be about how changes are synchronized between devices!
Coexisting VirtualBox and VMWare Fusion on macOS
Both VirtualBox and VMWare Fusion are neat virtualization tools. I use Fusion for most day to day work - it’s served me well for a long time and I have a significant stash of useful machines in it. But sometimes I also need to use VirtualBox, typically for working with Vagrant. The problem is that the two of them don’t get along very well…
Both VirtualBox and VMWare Fusion are neat virtualization tools. I use Fusion for most day to day work - it’s served me well for a long time and I have a significant stash of useful machines in it. But sometimes I also need to use VirtualBox, typically for working with Vagrant. The problem is that the two of them don’t get along very well…
When you install VirtualBox and then try to start a VM in Fusion you’ll see something like this:
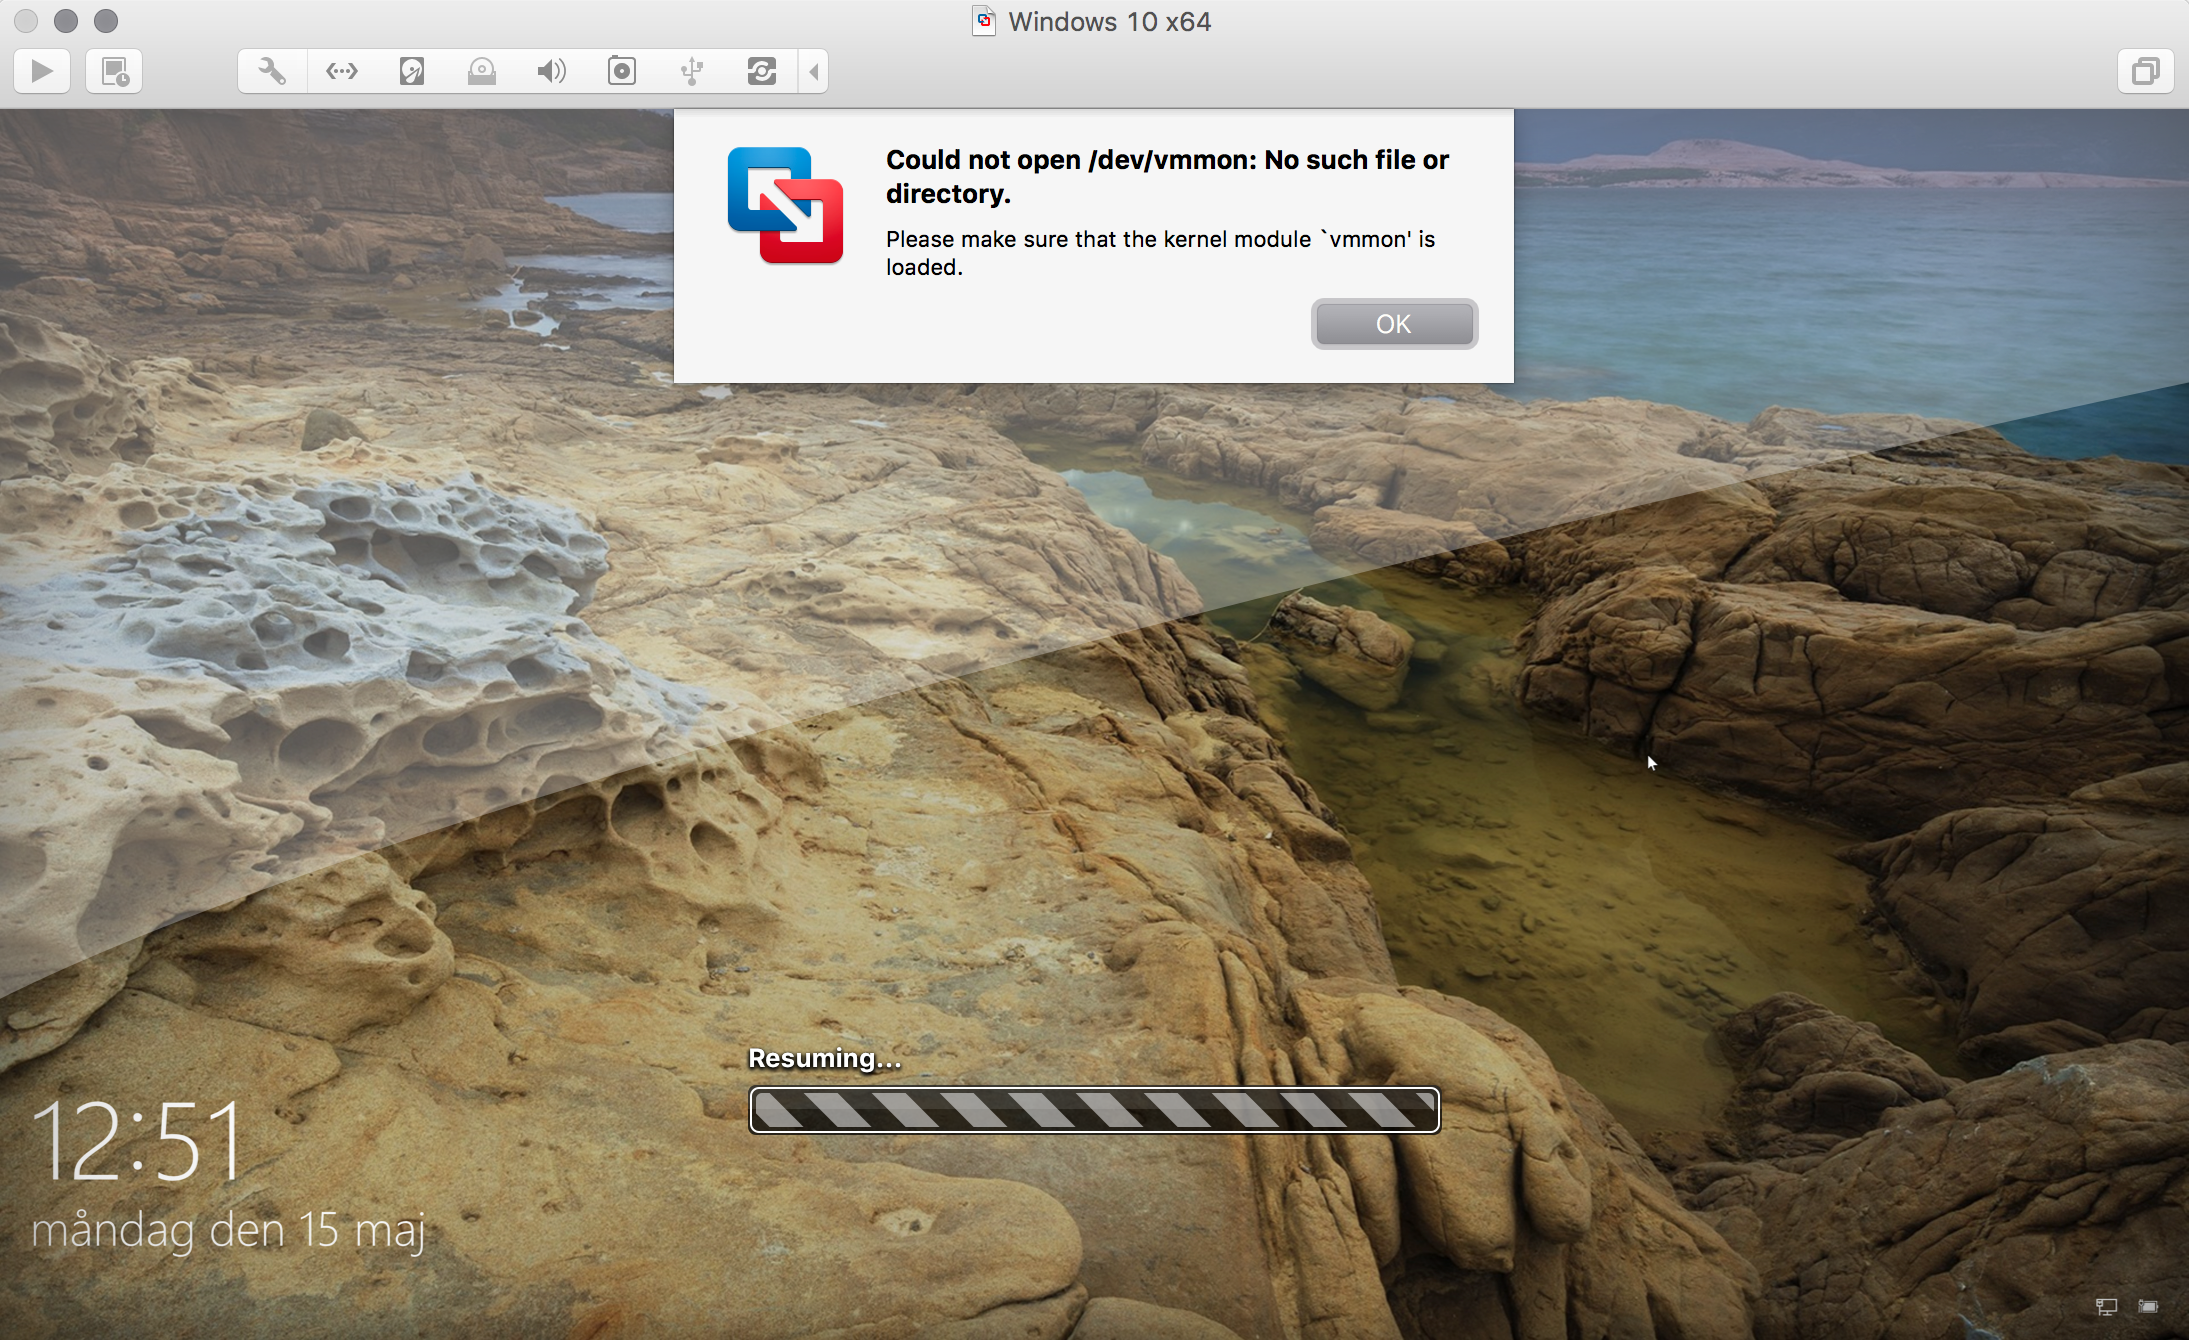
Could not open /dev/vmmon: No such file or directory.
Googling this will lead you to the answer that VirtualBox and Fusion are incompatible and that you need to uninstall VirtualBox. I didn’t find a better solution documented, so here it is in blog post form now instead.
The incompatibility is between the kernel extensions used by each. I think Fusion is the more well behaved in this respect - it loads and unloads its kernel extensions as it starts and stops. This means that when it’s not running, VirtualBox can run. But VirtualBox doesn’t do this. It loads kernel extensions at installation time (and presumably on boot thereafter). You can see these in kextstat:
jb@unu:~ $ kextstat | grep virtualbox
  226    3 0xffffff7f83d52000 0x61000    0x61000    org.virtualbox.kext.VBoxDrv (5.1.22) 93316754-E074-3CE2-9464-DDA4356FF02E <7 5 4 3 1>
  228    0 0xffffff7f83bd8000 0x8000     0x8000     org.virtualbox.kext.VBoxUSB (5.1.22) D956DCFA-4E4F-320A-BEBC-E4823501B1FF <227 226 41 7 5 4 3 1>
  230    0 0xffffff7f83c22000 0x6000     0x6000     org.virtualbox.kext.VBoxNetAdp (5.1.22) 4A6C39E1-5D90-3E34-9673-57B0DD779CD7 <226 5 4 1>
  231    0 0xffffff7f83c28000 0x5000     0x5000     org.virtualbox.kext.VBoxNetFlt (5.1.22) 446923A0-E855-3E75-9173-66FA4CE2474A <226 7 5 4 3 1>
We can work around this with a couple of scripts so that we can at least switch between the two manually. To be able to run Fusion we need to unload the VirtualBox kexts:
#!/bin/sh
for id in VBoxNetAdp VBoxNetFlt VBoxUSB VBoxDrv; do
    kextunload -b "org.virtualbox.kext.$id"
done
Save that as ~/bin/unload-vbox or something and run it as sudo unload-vbox. When we’re not running Fusion we can load the VirtualBox kexts and VirtualBox will work fine:
#!/bin/sh
for id in VBoxDrv VBoxUSB VBoxNetFlt VBoxNetAdp; do
    kextload -r "/Library/Application Support/VirtualBox" \
     "/Library/Application Support/VirtualBox/$id.kext"
done
In the end, some sort of coexistence is achieved. :)
Syncthing Stable & Candidate Releases
A while back we used to release once a week. Since this summer releases are made every second Tuesday. We will now introduce the concept of “stable releases” and “release candidates”.
A while back we used to release once a week. Since this summer releases are made every second Tuesday. We will now introduce the concept of “stable releases” and “release candidates”.
A new release candidate will be released every two weeks, based on the current state of development. That’s pretty much what we’ve always been doing. The difference is that it will then be in testing for about two weeks before being promoted to stable release status.
You can read more about the details in the documentation article, but I’ll include the table summarizing the differences here:
StableCandidateStabilityMore stableMore experimentalFeatures & FixesAbout two weeks behindLatestAuto UpgradesOptionalMandatoryAnon. Usage ReportingOptionalMandatorySupportFully supportedFully supported
You’ll note that usage reporting and automatic upgrades (depending on how you installed) are always enabled on candidate builds. You may have strong opinions on this and do not want to enable usage reporting. That’s perfectly fine and the stable release is for you.
The ability to chose between stable and candidate will be in v0.14.22, released later this week. If you have automatic upgrades enabled, you will be greeted with a notification similar to this:

The automatic upgrades prompt.
Syncthing will also make an initial choice for you:
Do you have automatic upgrades and usage reporting on today? Syncthing will default to the candidate channel. Your next upgrade will be v0.14.23-rc.1 in about two weeks.
If you have either of those turned off, Syncthing will default to the stable channel. Your next upgrade will be v0.14.23 in about a month - two weeks after the v0.14.23-rc.1 candidate.
If Syncthing didn’t make the right choice for you, you can change it whenever.
If you install from our APT repository, you can manually add the new candidate channel, nothing will happen automatically. If you install from some other source, they will hopefully give you the stable release and nothing else.
I hope this will give more stability to the users who prefer that, and keep the pace quick for the users who prefer that.